Sunday, September 26, 2010

Class #4: Potato Soup

With deboning a chicken and making Coq au Vin and a very crazy busy week I have found myself about to take class #5 tomorrow and have yet to tell you about class #4!  Soooo let me do that now.

To start off we learned about the 5 mother sauces, which are:

1. Veloute' - Sauce with light stock & roux (fat & flour)
2. Bechamel - Sauce with milk & roux
3. Tomato - Sauce with tomatoes
4. Hollandaise - Sauce with eggs, lemon juice and oil
5. Espagnole - Sauce with tomatoes, stock & roux

So after our CI expressed his disappointment that no one read the book this week (I hate disappointing the CI but I did debone a chicken - doesn't that count?) he did an overview of the chapter on Stocks & Sauces.  We watched a video on each of the 5 mother sauces being made and learned all about the types of stocks and the difference between that and broth. Broth is clarified stock.  Stock is where you get all the flavoring from either vegetables, chicken and/or beef.  We learned about mirepoix which is 50% onions, 25% celery and 25% carrots.  We then learned about deglazing (using liquid to take bits off bottom of pan), carmelizing (cooking natural sugars out of food) and what goes in a sachet (peppercorns, bay leaf, parsley, garlic & thyme). 
I actually found myself a bit intimidated as the chef gave us our class assignment: make Potato Soup and a bread of our choice.  No instructions, no recipe, no CI does it first and we copy - just make vegetable stock and make potato soup from it. I know, I know - it's just soup but it's a soup I've never made before and have to present to my CI who will taste it and tell me his opinion on it.  After getting new partners to work with you could tell most of the class was a bit inimidated so he promised he would help us in the kitchen and he did.  We made our vegetable stock using our leftover pieces of veggies that we practiced our 8 cuts on.  Then we covered that with water and added our sachet to make the stock.  We then strained that to have our veggie broth as our base for our potato soup.  My partner diced up potatoes as I fried up some bacon for our garnish.  We were doing fine with the CI's help to guide us along.  What's funny is the first time he came over he said we were going to starve him to death on how little we were making so we chopped up a bunch more potatoes and I guess we got carried away because we ended up at the end with soooo many veggies that we had to throw out. That wasn't good, but our potato soup actually turned out okay after we added buttermilk and half & half and then got to use an emulsifier to puree our soup.  With some dashes of salt & pepper it was actually started to taste pretty decent.  We served it in cute ramekins and garnished with bacon bits, cheddar cheese & green onions and some toasted bread to go along with it.  We got lucky on the bread as the baking class before us had plenty of extra loaves laying around for us to use. Overall we got a good review with some small tweaks for improvement but our CI was pleased with our product being our first potato soup we both ever made.

Next week (I guess that would be tomorrow) we draw out of hat a type of soup that we have to make from scratch.  There are 7 different ones to choose from.  I just hope I don't end up getting split pea soup...blech.  My husband will get all those leftovers FOR SURE. 

Wednesday, September 22, 2010

New Recipe

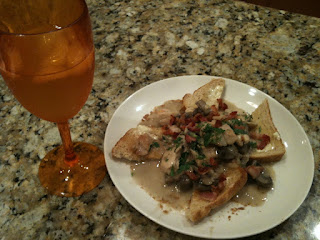
Coq au Vin Blanc
Recipe from: Rachel Ray Magazine
Taste Rating: 9 out of 10
Execution Rating: 8
Learned: The flavor of Pinot Grigio instead of Moscato
as my white cooking wine

So from the thighs and breasts of the chicken I cut up I decided to make Coq au Vin (Chicken with White Wine).  I have three different recipes for this dish - one that is very amateurish and turns out more to be more like country smothered chicken, one that is a little more advanced using white wine and one that is from my simple french cook book and uses red wine.  I decided to go with the white wine version.  I didn't take pictures along the way so I am providing the recipe for this one to help explain the process and to share a very good recipe with you that is worth trying.

3 Tbsp EVOO                                                                            4 sprigs of thyme
1 lb boneless chicken breast, cut into 2” pieces                     2 cups chicken broth
1 lb bones chicken thighs, cut into 2”pieces                           2 cups dry white wine
2 Tbsp flour, plus more for dredging                                        ½ cup heavy cream
4 slices of bacon, chopped                                                       8 slices of break
1 lb of frozen pearl onions (about 2 cups)                               2 garlic cloves
  *(I used sliced onions)                                                           Butter for spreading
1 bay leaf                                                                                  Parsley for garnish

Heat 2 tbsp of EVOO, in a large skillet over med-high heat.  Season the chicken with salt & pepper, dredge in flour & add to the pan in single layer; do not crowd the meat.  Cook the chicken until browned about 4-5 minutes on each side.
While the chicken is working, heat a large Dutch oven or deep skillet over med-high heat with the remaining EVOO. When the oil is hot, add the bacon & cook until crisp, about 5 mins.  Remove the bacon with slotted spoon & drain on paper towels.  Pour off a little bacon fat, leaving a thin layer in dutch oven.  Add the onions, thyme (whole sprigs), mushrooms & bay leaf.  Cook until onions have a little color and mushrooms are tender, 7-8 mins.  Add 2 tbsp flour to dutch oven and cook for 2 mins.  Deglaze with chicken broth and cook for 5 mins.
Over high heat add the wine to the cooked chicken in skillet and scrape up bits.  Reduce the liquid for 5 mins, then add the chicken & wine to the broth & vegetables in dutch oven; stir to combine.  Stir in the cream, lower heat to a simmer & reduce sauce for about 5 mins.
Toast your bread and rub garlic across the hot toast and butter lightly (oops...I obviously buttered heavy as you see it in the picture). Cut slices of toast corner to corner.  Remove the bay leaf & thyme from sauce.  To serve, fan toast triangles across plate, lining up points and top with chicken & sauce. Top with bacon & parsley.

I followed the recipe exactly except I added a bit of cornstarch at the end to thicken it up a little more and I used sliced onions instead of frozen since I couldn't find them.  The final result was a total success as the kids even ate it and my husband praised me multiple times while eating it. With 2 cups of wine and bacon I knew it was going to be good. :)  If I would change anything it would proabably be the presentation, it just didn't show quite as good as it tastes.If you do try it, please share pictures and your process. I would love to hear how you did.

Monday, September 20, 2010

Homework: Breaking down a chicken

Since our CI broke down a whole chicken in lab last week I thought I would give it a try myself.  With my $4 whole chicken and my filet knife I went for it.  I had my husband take pictures along the way but I decided not to post many of them because well honestly, it wasn't pretty.  My technique at this point is a bit brutal and with chicken juice and guts going everywhere I was just so grateful I didn't video tape it.  My end result was pretty good though as I ended up with the right parts and they looked like how you would get them at the store (sort of): thighs, legs, breasts (including tenderloins) and wings. 
A quick summary with the pictures I did keep:
To start I cut the wings off:
Then I cut the legs off with thighs attached as it's easier to separate them when they're off the chicken.  What you're looking for is the fat line that separates the thigh from the leg and cut that line to separate them.

Here I have my wings, legs and thighs and a pile of all the excess fat (yum). 
Then I took the back of the chicken off, just sort of pulled it and put this in a pot to make stock for soup.  Then I turned the chicken breast side up and cut down the middle. I was supposed to cut out the wishbone first and somehow mine broke in the process, so no wishes for me.  Cutting the breasts was probably the easiest part since I wasn't dealing with bones and could really see what I was doing.  I learned from class that under the breasts are the tenderloins which are often used to make chicken tenders.  I separated those and saved them for later.  The parts I would be using tonight were the breasts and thighs.
So the whole process is not too difficult but I'm not gonna lie - its freaking messy.  Next time I think I'll dry my chicken out more with paper towels to help reduce some of the liquid. 
I will tackle this again since this was very cost efficient and I used every part of the chicken making two meals and still have some leftover.  I also need to try again to take better pictures to share.  My next post will show you the delicious meal I made with the boneless thighs & breasts. 

Tuesday, September 14, 2010

Class #3 - Finally we get to cook!

Last night was my 3rd night of class and we finally got to cook & use our knives!  I was so nervous in class today as we had our first exam and would be in the kitchen for the first time.  The exam turned out to be easier than I expected and I think I did really well as it was only word associations.  Phew!  Then we watched a video on types of cuts.  The main cut we would do in our lab today was Julienne, which is 1/8 x 1/8 x 2 inches.  Did you know each type of cut has a precise measure?   I didn't until this class.

So to our kitchen lab we went with our partners and our assignment: use dark chicken meat to cook a dish any way we'd like with julienne cut carrots and celery and add a starch to our plates.  Our Chef Instructor (CI) rattled off a bunch of dishes we could prepare.  I do not know many recipes by heart - okay, I don't really know any by heart.  I am a glued-to-my-recipe-kinda girl.  But luckily my partner knew a chicken recipe she liked with oyster & soy sauce. We decided to go for it.  Hunting down everything in this new kitchen was the hardest part.  After getting all our ingredients and pots & pans we were ready to start cooking.  We each julienned our carrots and celery.  Then we diced up some garlic and onions.  We each deboned our chicken pieces which is much easier when you have a sharp filet knife (highly recommended).  My partner started the chicken and I started the rice.  We settled for jasmine rice since we couldn't find minute rice.  It is starchier and produced much more than we anticipated.  We thought our rice was going to be a do-over but we salvaged it when we fried it up with an egg and some green onions.  I sauteed the veggies and we ended with a great looking dish.  Our final product ended up being on the salty side and this was confirmed by our CI as he tasted our final product.  Have him critique our dish was just like being on one of the Food Network Challenge shows as we awaited his verdict. 

Before we cooked, our CI gave us a demo of deboning a whole chicken: Wings first, then legs, then back, then breast.  I so have to try this at home and knowing that buying whole chickens is much cheaper than buying parts - I will likely be doing this often to save money and do my homework.

It was so awesome to cook a full meal and then I got to be the MOD (Manager on Duty) and got to delegate the assignments for clean up.  That was fun.  I like being in charge.  Overall, I just enjoyed the whole class. I'm hoping next time I can see more dishes others make and maybe sample a few.  I love to see what others come up with.  And next time I have to bring home leftovers for my husband!  I discovered the take out boxes after I devoured my salty but yummy Oriental Oyster Chicken.  

So next class we'll be learning the 5 mother sauces and get new partners.  I can't wait! In the meantime I'll be doing homework to practice - something with chicken or at the least julienned.  :)

Wednesday, September 8, 2010

Homework Assignment: Practice Cutting

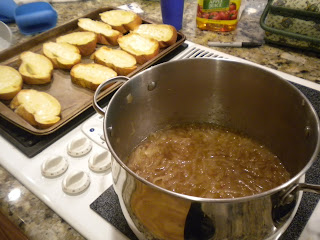
Since I did not have class this Monday due to the Holiday, I decided to use the time off to do my homework assignment - to practice cutting with my knives.  I began my homework with 5 pounds of onions and a goal of onion soup and decided to slice them all. 
I remembered reading in my book that leaving one end of the onion in tact helps keep the onion together when slicing.  This helped quite a bit but I still felt awkward in my cutting as it took me a long time and my slices were not all uniform in size.  Lacking confidence I refered again to my book and read the part on the proper way to hold a knife - three fingers wrapped around the bottom with the top of the blade in between your thumb and fore finger.   Wait a minute?  I've been holding my knife wrong?  I have all my fingers wrapped around the handle - does this really make a difference?  So I tried it as the book suggested and yes, it really makes a difference.  I felt more control with the knife and finished up the last of my onions wishing I had 5 more pounds to slice with this new found knowledge. 
     With my 5 pounds of sliced onions I began to make my soup.  I added some bacon in for flavor and sauteed my onions keeping the pot covered.  As they started softening I took the cover off and let them carmelize.  I then added some white wine (Moscato of course as this is what I always have on hand) and then one can of chicken broth and one can of beef broth.  Lots of salt and pepper and a little thyme and that was it.  I toasted some bread with butter and melted cheese on top and I was set to enjoy. 
     So what did I learn from doing my homework assignment?
I learned the proper way to hold a knife - which right there is worth the cost of tuition.  I learned that the best flavoring for onion soup is apple cider instead of wine.  Wine is fine but my favorite onion soup was when I used cider as the liquid to deglaze the pan.  I learned that onions always reduce when cooked so if you think you have too many onions you likely don't - cook more.  And I learned that this assignment made me love onions even more.  I'm off to buy another 5 pounds and keep practicing my homework.

Thursday, September 2, 2010

2nd Day of Class

Monday was my 2nd day of my Intro to Cooking Class.  Unfortunately we did not get to spend time in the kitchen as there was a lot to cover in lecture, but I did learn a lot and was given my first homework assignment: to practice my cutting skills. 
     The first 30 minutes we watched a video of Charlie Trotter (very famous chef, author of cookbooks and host on a PBS cooking show).  He gave an inspirational speech on professionalism in the "world of food" as he put it.  I enjoyed hearing him speak and share inspiration on what he loves.
     The remaining time of class we went over the first few chapters in our book - the first chapter was on the history of cuisines and the chefs who started them.  From there we hit some main points on nutrition, safety & sanitation.  We then dove in to the chapter on recipes & menus and then learned about recipe conversion and food cost per plate. This required some math and following a formula that had me scratching my head a bit but I think I'll catch on after I thoroughly read the chapter.  He then went over what the knives in our knife set are each meant for and the safety involved.  He shared a story about a girl who cut her fingers on the first day of class because she wasn't paying attention while cleaning her knife.  I fear this will be me.    
     We did go to the kitchen at the very end for another tour and to ask any questions as next time we will spend most of the time in the kitchen. 
     We don't have class next week due to the holiday and I'm going to miss it.  I really have learned so much already.  I will definitely be doing my homework and hope to share my progress along the way.  Did you know I never knew the right way to cut onion!?  Oh so much to learn....
Til next class.

Wednesday, September 1, 2010

Danielle Dishes Up - A recipe I've always wanted to try

Beef Wellington
Recipe from: Rachel Ray Magazine
Taste Rating: 8.4 out of 10
Execution Rating: 6
Learned: That it takes 40 minutes to defrost puff pastry dough.  That I should have all my ingredients cut & ready before turning on the stove and that my chef knife is sharper than I thought - OUCH!
I have had this recipe for a while and every time I would see the picture I would just drool.  I finally decided that during my week of vacation I would be able to give it the time it needed and decided to go for it.  Boy, do I underestimate the timing of things!  I didn't know it took 40 minutes to defrost pastry dough sheets.  I didn't know I had to let the meat sit in the fridge for 30 minutes after I put the mushroom topping on it and I didn't know it would take me so long to chop 2 pounds of mushrooms. Needless to say an hour after I thought it would be ready I did end up with a very pretty golden brown Beef Wellington that was cooked to perfection (thanks to my handy dandy new thermometer - which I properly calibrated thank you very much).  The flavor was very earthy tasting with the portobello mushrooms and thyme.  I used Beef Tenderloin from Harter House and it was worth it - so tasty.  I enjoyed the pastry dough but overall I thought it was missing something - a gravy or something to balance that earthiness.  I was very pleased my result being my first Beef Wellington to ever make, but don't think I'll try this one again for a while - it did take a lot of steps. 

So how did I find out my chef's knife was so sharp, you ask? When I used it like it was my Rachel Ray knife and cleaned the food off with my hand - I got myself a nice (paper cut sized) slice on my left palm.  So glad I didn't do that in class!  Gotta get use to my knives!